HRC Setting Data & Maintenance Information
RS125R / RS250R Suspension Settings
Please 'Refresh' this page every time you visit. If it is slow to reload, you know then that this page has been updated since your last visit.


•Important items in proceeding suspension settings
Road holding feel - stability - turning capability - lightness
What you should note in proceeding suspension settings is that road holding feel and stability are in some sense incompatible with turning capability and lightness. For these reasons, giving priority to stability very much will result in better riding comfort, but slow in time settings.
They should be well balanced for the best settings. If four items above are well balanced, good times will result.

The standard settings (described in the manual) are intended for the public. Accordingly, they do not suit particular rider's physique or riding style and you may feel difficulties in driving depending on course layouts.
First, sinkage associated with riding load of 1G and suspension stroke after running should be determined, and then from these data spring stiffness (rate/initial) suited for riders should be identified.
1G setting
Riding 1G sinkage refers to front and rear suspension strokes given when a equipped rider rides on a machine and places his/her arms on the handle with the body slightly slanting to the front. Followings are measurements of this stroke.
A) Measure the unloaded machine stroke.
B) Measure the stroke given when an equipped rider rides on a machine and places his/her arms on the handle with the body slightly slanting to the front. If the value A) minus the value B) is 10 to 20mm, it is acceptable.
Measurement points
Front : Wrap the front fork with tie wraps and measure the clearance to the axle holder upper surface.
Rear : Measure the distance between the rear axle and the seat bolts.
About alterations when the 1G measured value is not within 10 to 20mm, unlike item (B) above.
1) 1G stroke is too lower than the above values
Spring initial for both the front and rear should be released to ensure strokes associated with slight loads at 1G.
2) 1G stroke is too higher than the above values
Advice
During spring pre-load setting, the front and rear balance can be roughly determined by sinkage of the front and rear suspension given when the tank is pressed down at the rear end.
It is acceptable if the front and rear suspensions sinks by the same amount at the same time when the tank is pressed down.
Find the way of determining which meets your requirements.
Note
Since the 2001 and 2002 year models RS250R are different in rear suspension link characteristics, strokes at 1G tend to be lower.
First, run at the standard settings.

Selection of spring rates
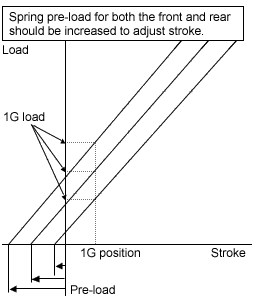
Spring pre-load settings should be made at 1G and strokes after running should be checked.
1 )Stroke is too lower
Spring pre-load for both the front and rear should be released to ensure strokes.
2) 1G stroke is too higher than the above values
Spring pre-load for both the front and rear should be increased to adjust stroke.Suspension stroke position by year (unit: mm)
'97 '98 '99 '00 '01 '02 '03 '04
RS125R
Front/R 41.5 41.5 41.5 41.5 11.5 11.5 11.5 9.5
Front/L 46.5 46.5 46.5 46.5 16.5 16.5 16.5 14.5
Rear 2nd line from top
'97 '98 '99 '00 '01 '02 '03 '04
RS250R
Front 6 6 6 6 12.5 12.5 12.5 12.5
Rear rubber position : 1st line from top
Values in the table; for front, expressed by the distance from bracket top surface.
Ideal position of remaining stroke settings by year
'97 '98 '99 '00 '01 '02 '03' 04
RS125R
Front/R 46.5 46.5 46.5 46.5 16.5 16.5 16.5 14.5
Front/L 51.5 51.5 51.5 51.5 21.5 21.5 21.5 19.5
Rear 2nd or 3rd line from bottom
RS250R
Front ca.11 ca.11 ca.11 19.5 17.5 17.5 17.5 17.5
Rear Middle Middle Middle Middle 2/3 2/3 2/3 2/3
Values in the table (for front, expressed by the distance from bracket top surface)
*Stroke ideal positions above are given for informational purposes.
You may have a difficulty in keeping a balance between 1G adjustment, influencing portions not subject to relatively large loads, and actual running settings of strokes, including maximum loads.
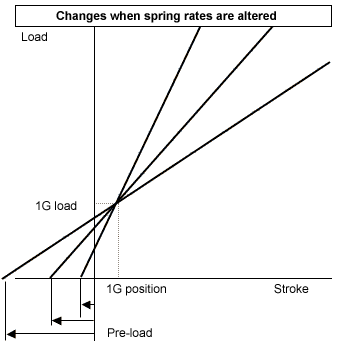
1) 1G adjustment will cause too stiff suspension Reduce spring rates
2) 1G adjustment will cause too soft suspension Increase spring rates
3) Changes when spring rates are altered
RS125R
Front/R 41.5 41.5 41.5 41.5 11.5 11.5 11.5 9.5
Front/L 46.5 46.5 46.5 46.5 16.5 16.5 16.5 14.5
Rear 2nd line from top
'97 '98 '99 '00 '01 '02 '03 '04
RS250R
Front 6 6 6 6 12.5 12.5 12.5 12.5
Rear rubber position : 1st line from top
Values in the table; for front, expressed by the distance from bracket top surface.
Ideal position of remaining stroke settings by year
'97 '98 '99 '00 '01 '02 '03' 04
RS125R
Front/R 46.5 46.5 46.5 46.5 16.5 16.5 16.5 14.5
Front/L 51.5 51.5 51.5 51.5 21.5 21.5 21.5 19.5
Rear 2nd or 3rd line from bottom
RS250R
Front ca.11 ca.11 ca.11 19.5 17.5 17.5 17.5 17.5
Rear Middle Middle Middle Middle 2/3 2/3 2/3 2/3
Values in the table (for front, expressed by the distance from bracket top surface)
*Stroke ideal positions above are given for informational purposes.
You may have a difficulty in keeping a balance between 1G adjustment, influencing portions not subject to relatively large loads, and actual running settings of strokes, including maximum loads.
1) 1G adjustment will cause too stiff suspension Reduce spring rates
2) 1G adjustment will cause too soft suspension Increase spring rates
3) Changes when spring rates are altered
Advice
Changes to spring rates will be accompanied by changes in 1G, requiring readjustment.
Rate changes will be made one by one rank.
As the basic concept for suspension setting, making full use of suspension stroke with controlling front and rear loads will allow speedier cornering.
Too stiff suspension with no movement will cause you to have a problem in taking a cornering chance.
Identify differences from initial changes and use them properly.
Basic body position
The position at the basic (static) state, including slanting forward or rearward, will largely control the machine characteristics.
1)Characteristics by body positions
The position at the basic (static) state, including slanting forward or rearward, will largely control the machine characteristics.
1)Characteristics by body positions
•Flat position

This is the standard position.
There is no specialized characteristics, having well balanced overall specifications.
However, it may have a problem in controlling the machine depending upon course layouts or riding style.
There is no specialized characteristics, having well balanced overall specifications.
However, it may have a problem in controlling the machine depending upon course layouts or riding style.
•Slanting forward position

In this position, the front has a larger load distribution. It provides a good turning capability, but, when at extremely slanted, you have a difficulty in controlling when loads are applied to the front during braking.
Unless loads to the rear are actively controlled, the rear tires may be slippery.
Unless loads to the rear are actively controlled, the rear tires may be slippery.
•Slanting rearward position

The position of slanting rearward tends to provide dullness in approaching a corner although it gives stability.
It is effective against excessive loads to the front on descending corners. However, since it will result in degraded turning ability (especially for throttle on), and extremely rearward slanting position will cause under-steering at a corner, resulting in worse lap time.
It is effective against excessive loads to the front on descending corners. However, since it will result in degraded turning ability (especially for throttle on), and extremely rearward slanting position will cause under-steering at a corner, resulting in worse lap time.
•High position

High position at both the front and rear improves turning capability, but may provide unstable factors including fore-and-aft pitching.
It gives slightly heavy falling feel at the beginning of falling, and when falling begins, it causes more and more falling force.
It gives slightly heavy falling feel at the beginning of falling, and when falling begins, it causes more and more falling force.
•Low position
Low position at both the front and the rear degrades turning capability opposed to the high position, but allows you to easily make a chance to fall, providing light banking feel.
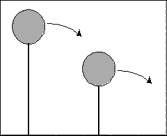
The figure to the left helps understand the characteristics caused by changing height, showing two rods, with weights installed at the tip, are well balanced on your palm.
In this figure, the longer rod (means a high position) has slower speed in beginning to fall, which allows you to easily take a balance, but when falling, has more and more speeds and force.
The shorter rod (low position) has higher speeds when beginning to fall.
In this figure, the longer rod (means a high position) has slower speed in beginning to fall, which allows you to easily take a balance, but when falling, has more and more speeds and force.
The shorter rod (low position) has higher speeds when beginning to fall.
2) Ride height adjustment setting flow chart
•Insufficient turning capability
Symptom Degraded turning capability during cornering
Cause Position slants rearward, causing insufficient caster angles
Counter-measure Increase front projection and heighten rear height to increase caster angles
•Steering ability
Symptom When cornering during braking, the front steers inner.
Cause Excessive front load. Too high caster angles
Counter-measure Reduce front projection and lower rear vehicle height to reduce caster
•Shaky handle
Symptom Handle shakes during rising from a corner.
Cause Insufficient front load
Counter-measure Increase front projection and rear vehicle height to move loads
Advice
Adjustment should always be made in unit of mm (2 to 3mm). Setting changes should not be made at two or more locations for the same purpose (e.g. for both increasing projection and heightening rear vehicle height)
Note
Not only vehicle height but also suspension stroke will largely influence the symptoms above.
When complaints are found, settings should be made taking into account overall positions including strokes.
Damping adjustment
Flow chart of setting by damper adjustment
•Unstable during braking
Symptom Becomes unstable during braking.
Cause Insufficient front compression and rear tension causes too quick position changes.
Counter-measure Increase damping for front compression side and increase damping for rear tension side.
• Lack of turning ability
Symptom Under-steer during rising at a low-speed corner.
Cause Insufficient front tension and rear compression causes too quick position changes.
Counter-measure Increase damping for front tension side and increase damping for rear compression side.
• Restless
Symptom Machine becomes restless during steering or throttle on/off
Cause Insufficient damping
Counter-measure Increase damping
• Strong pushing up
Symptom Rough ride and no road holding feel
Cause Too high damping
Counter-measure Decrease damping
Advice
Damper setting changes should always be made one by one point. If more than two points are changed at the same time, it is difficult to confirm effects resulting from setting changes.
New suspension running in can be completed sooner by completely releasing damping at first for large strokes.
Springs/vehicle height settings act as bearing loads even at stationery states, but dampers become operative only when suspensions move.
Note
Damping varies largely with oil viscosity. Also, damping feel may vary largely with oil types even if they have the same oil viscosity. So, when you ask about settings, it is necessary to make sure oil viscosity and even oil manufacturer name.
Oil level adjustment
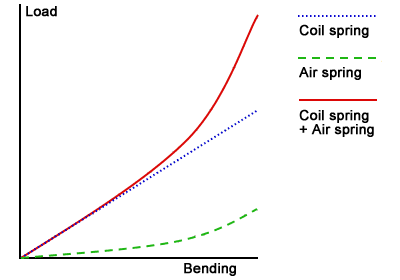
Suspension units, because of being airtight, provides air suspension effects when compressed causing inside air to be compressed. The front suspension is designed to determine spring constant by using both inner springs and air springs. For this, it provides more reactive force at near full strokes (when air is compressed).
Accordingly, oil level adjustment is used to change the amount of oil, thereby causing inner air volume to be changed, allowing setting at the innermost of strokes.
Hybrid spring characteristic generated by Coil spring and Air spring.
Advice
Since air springs produces more reactive force in the latter half of stroke, it will be used for setting when drastic stroke changes occur like braking.
Since air springs produces more reactive force in the latter half of stroke, it will be used for setting when drastic stroke changes occur like braking.
Flow chart of setting by oil level adjustment
• Bottoming
Symptom There is no problem with suspension setting at corners, but bottoming occurs during braking.
Cause Insufficient force at the innermost of strokes during hard braking
Counter-measure Heighten oil level (by 5mm unit)
Note
Since changes in air volume largely affect air spring characteristics, oil increase or reduction should be made by units of 5mm or less.
Other notes on suspension settings
•Front suspension inner pressure adjustment
Front suspension, when stroked repeatedly, will cause suspension inner air amount to be changed, resulting in changed inner pressure. For this reason, since settings are changing every time you ride on a machine, the inner pressure should be periodically adjusted.
•Settings associated with ambient temperature changes
Changes in ambient temperatures will cause suspension inner oil viscosity to be largely changed, needing resetting.
Ambient temperatures at 5°C or less in mid-winter will harden inner oil, while ambient temperatures at 30°C or more in mid-summer will largely lower oil viscosity, resulting in a problem with damping.
•Suspension split-tightening
Top bridge, bottom, and axle should be tightened to specified torque. Oil should not be applied and tightening should be made at dry conditions.
(top bridge: 2.3kgf.m, bottom bridge: 2.3kgf.m, axle: 2.2kgf.m)
SP125 Limited
22 Walker Wood, Baildon, Shipley, West Yorkshire, BD17 5BE, England
Telephone 01274 583231 [email protected] Mobile 07738 626165
22 Walker Wood, Baildon, Shipley, West Yorkshire, BD17 5BE, England
Telephone 01274 583231 [email protected] Mobile 07738 626165

SP125 Limited Disclaimer
Honda, HRC and all other parts supplied by the SP125 Limited are not guaranteed when used in competition events.
As such, it is a condition of our making all parts available that it is solely the decision of each individual, rider, team member or
team whether they choose to use any part supplied and in doing so, absolve the manufacturer and SP125 Limited of any or all
such claims, including damage to equipment and/or injury to personnel irrespective of how caused.
All parts remain property of SP125 Limited until paid for in full.
All 'special order' parts, that are ordered specially under the instruction of the customer, are non returnable and non refundable.
