1995 NX5 /2008 NXA RS250 HONDA - 16 settings Ignition Curve Changer
Please 'Refresh' this page every time you visit. If it is slow to reload, you know then that this page has been updated since your last visit.
Change your Standard RS250 Honda ignition-timing map the easy way
The Curve Changer will alter and improve your ignition map profile.
The reason the curve changer works is that the standard ignition is a generalisation for all
... it is not too difficult to tune, suitable for all fuels, all gearing, etc.
After designing a programmable ignition for the RS250 and RS250 Kit crank, the largest requirement was to increase the drive area advance, without then causing the over rev to 'brick wall' do to its increased compression effect. A simper lower cost unit could provide this requirement. … The curve changer
The largest advantage is in the increase in the spread of power
The 16 settings unit is an enhancement of the standard RS250 Curve Changer. It allows a switch selectable range of map alteration.
By using fixed switch values the result is accurate and repeatable.
The switch has 16 positions 0...9, A, B, C, D, E, and F:
(0) Is 80% of the standard curve changer value.
(8) Is the same as the standard curve changer value.
(F) Is 120% of the standard curve changer value.
Each switch position is a step increase in the curve changer value. With a changing the curve changer switch values the static advance will need to be advanced.
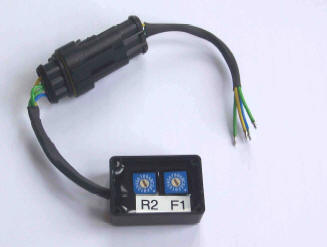
The unit is mounted using velco provided, The switches are waterproof and the unit should be operated with the cover on
The switch closest to the cable marked R2 controls the Rear No2 cylinder.
The switch away from the cable market F1 controls the Front No1 cylinder.
Fig 1. Standard RS250 Curve Changer
This diagram shows both the ignition curves the power jet and power valve action with RPM. The standard curve changer enables increased advance in the drive area and over rev retard.
The reason the curve changer works is that the standard ignition is a generalisation for all
... it is not too difficult to tune, suitable for all fuels, all gearing, etc.
After designing a programmable ignition for the RS250 and RS250 Kit crank, the largest requirement was to increase the drive area advance, without then causing the over rev to 'brick wall' do to its increased compression effect. A simper lower cost unit could provide this requirement. … The curve changer
The largest advantage is in the increase in the spread of power
The 16 settings unit is an enhancement of the standard RS250 Curve Changer. It allows a switch selectable range of map alteration.
By using fixed switch values the result is accurate and repeatable.
The switch has 16 positions 0...9, A, B, C, D, E, and F:
(0) Is 80% of the standard curve changer value.
(8) Is the same as the standard curve changer value.
(F) Is 120% of the standard curve changer value.
Each switch position is a step increase in the curve changer value. With a changing the curve changer switch values the static advance will need to be advanced.
The unit is mounted using velco provided, The switches are waterproof and the unit should be operated with the cover on
The switch closest to the cable marked R2 controls the Rear No2 cylinder.
The switch away from the cable market F1 controls the Front No1 cylinder.
Fig 1. Standard RS250 Curve Changer
This diagram shows both the ignition curves the power jet and power valve action with RPM. The standard curve changer enables increased advance in the drive area and over rev retard.
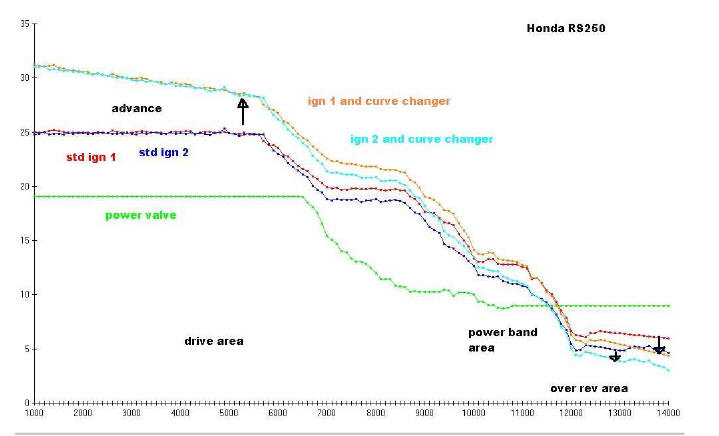
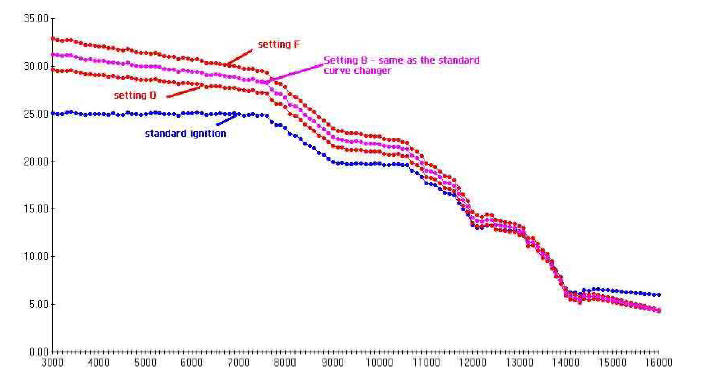
Fig 2. 16 setting TZ250 Curve Changer
This diagram shows the effects of the range of the 16 settings, allowing the user to fine tune the ignition map.
This diagram shows the effects of the range of the 16 settings, allowing the user to fine tune the ignition map.
Installation Procedure
Installation Procedure
1. Advance the static timing
Initial base setting
Set the curve changer unit to switch position 8
Advance the static plate by 8 degrees; this may require a slight widening of the slots.
1. Advance the static timing
Initial base setting
Set the curve changer unit to switch position 8
Advance the static plate by 8 degrees; this may require a slight widening of the slots.

ROTATE THE IGNITION ADJUSTER PLATE ANTI- CLOCKWISE
Measure in rotation mm:
0.97mm per degree at the plate marked edge – 8 degrees is 7.7mm
( 0.73mm per degree at the pick-up surface - 8 degrees is 5.8mm )
Fine Adjustment
If the over-rev is brick walling (will not rev out at max RPM) but has strong acceleration then turn the curve changer switch up one setting
If the over-rev is higher, but the acceleration not strong, then turn the curve changer switch down one setting
Specialist setting
To increase the curve changer effect (drive advance and over-rev) and retain the mid range, the static
plate needs to be advanced more and at the same time the curve changer setting increased to return
the timing to the correct level:
For 6 degrees = 5.8mm at ignition adjuster plate (at pick-up 4.4mm) = Setting 0
For 7 degrees = 6.8mm at ignition adjuster plate (at pick-up 5.1mm) = Setting 4
For 8 degrees = 7.7mm at ignition adjuster plate (at pick-up 5.8mm) = Setting 8
For 8.5 degrees 8.2mm at ignition adjuster plate (at pick-up 6.2mm) = Setting A
For 9 degrees = 8.7mm at ignition adjuster plate (at pick-up 6.6mm) = Setting F
2. Connect the curve Changer
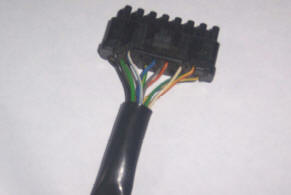
Solder the Curve Changer wires onto these wires as follows:
Curve Changer Yellow to ‘White with Yellow stripe’
Curve Changer Blue to ‘White with Blue stripe’
Curve Changer Green to ‘green with Blue stripe’ (some models this is just green)
Curve Changer Green to ‘green with Blue stripe’ (some models this is just green)
It does not matter which green to which green/blue they are the same connection
Tape the joins with tape. Pull back the outer sleeving. Plug in the curve changer.
By using a tyraps, or the Velcro on the unit, the Curve Changer then can easily be fastened to the front of the frame, for easy adjustment access.
To increase the curve changer effect (drive advance and over-rev) and retain the mid range, the static
plate needs to be advanced more and at the same time the curve changer setting increased to return
the timing to the correct level:
For 6 degrees = 5.8mm at ignition adjuster plate (at pick-up 4.4mm) = Setting 0
For 7 degrees = 6.8mm at ignition adjuster plate (at pick-up 5.1mm) = Setting 4
For 8 degrees = 7.7mm at ignition adjuster plate (at pick-up 5.8mm) = Setting 8
For 8.5 degrees 8.2mm at ignition adjuster plate (at pick-up 6.2mm) = Setting A
For 9 degrees = 8.7mm at ignition adjuster plate (at pick-up 6.6mm) = Setting F
2. Connect the curve Changer
Solder the Curve Changer wires onto these wires as follows:
Curve Changer Yellow to ‘White with Yellow stripe’
Curve Changer Blue to ‘White with Blue stripe’
Curve Changer Green to ‘green with Blue stripe’ (some models this is just green)
Curve Changer Green to ‘green with Blue stripe’ (some models this is just green)
It does not matter which green to which green/blue they are the same connection
Tape the joins with tape. Pull back the outer sleeving. Plug in the curve changer.
By using a tyraps, or the Velcro on the unit, the Curve Changer then can easily be fastened to the front of the frame, for easy adjustment access.
|
3. Check
Remember to allow for carburetion changes, increase the main by 2 jet sizes to be safe.
Use of a detonation indicator or counter is recommended.
In Stock now
RS250 Honda / TZ250 Yamaha : £265.00 + VAT
Remember to allow for carburetion changes, increase the main by 2 jet sizes to be safe.
Use of a detonation indicator or counter is recommended.
In Stock now
RS250 Honda / TZ250 Yamaha : £265.00 + VAT
Exports of all parts supplied outside of UK, to EU Countries, USA, Australia, South Africa, Asia etc are exempt from UK VAT and will be charged 0% VAT.
On arrival to your destination country, you may be asked to pay additional duties and taxes by customs, before the shipment is delivered.
Import tax, customs & duties regulations vary from country to country.
Payment of all Import tax, customs & duties charges are the responsibility of the customer.
SP125 Limited
22 Walker Wood, Baildon, Shipley, West Yorkshire, BD17 5BE, England
Telephone 01274 583231 [email protected] Mobile 07738 626165
22 Walker Wood, Baildon, Shipley, West Yorkshire, BD17 5BE, England
Telephone 01274 583231 [email protected] Mobile 07738 626165

SP125 Limited Disclaimer
Honda, HRC and all other parts supplied by the SP125 Limited are not guaranteed when used in competition events.
As such, it is a condition of our making all parts available that it is solely the decision of each individual, rider, team member or
team whether they choose to use any part supplied and in doing so, absolve the manufacturer and SP125 Limited of any or all
such claims, including damage to equipment and/or injury to personnel irrespective of how caused.
All parts remain property of SP125 Limited until paid for in full.
All 'special order' parts, that are ordered specially under the instruction of the customer, are non returnable and non refundable.
